Creating Database
- We need to following database table.

- So first you create a new database in your PhpMyAdmin (localhost/phpmyadmin).
- Inside the database we create the above shown table. And for this you can use the following query.
- When you will execute the above given query in your database you will get the following table.
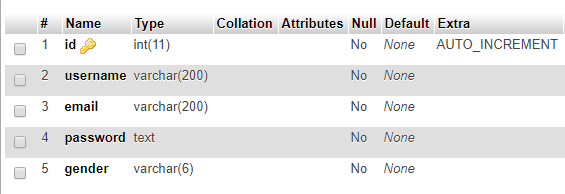
Database Table
- Now we have our database table where we will store the user data. Now lets create a PHP Project for our Web Services.
Creating a new PHP Project
- Go to the htdocs folder, and create a new folder there. (This folder is actually our project). You can use an IDE like PHP Storm to create a new project but remember create it inside htdocs only (c:/xampp/htdocs). Here I am using Sublime Text.
- Now the first step is the database connection.
Connecting to the Database
- So inside your project folder create a new php file named DbConnect.php. We will use this file to connect to the database. So write the following code inside.
- To confirm that the above script is working, you should open it in your browser (localhost/YourProjectFolder/DbConnect.php). If you are seeing nothing in the browser that means it is working fine.
Building Web Services
- Now here comes the main part. For the current application we need Web Services for two operation, the first one is User Registration and the second one is User Login.
- So for this create a new php file named Api.php. Inside this file we will handle all the API calls. Currently we have only two the User Registration and User Login.
- So write the following code inside Api.php.
Parameter Validations
- We also need to validate that the required parameters are available or not. For this at the bottom in the same file (Api.php), create the following function.
User Registration
- Now lets complete the user registration. So inside switch where we need to perform the registration write the following code.
- Now you can test the registration using a REST Client (I am here using POSTMAN).

- You see the user registration is working fine. Now lets create the User Login API.
User Login
- After registration user will login to the application. So again inside switch where we need to define the login write the following code.
- Now you can test the login part as well.

The Complete Api Code
- This is the complete code of my Api.php file.
- So we are finished creating with APIs. Now lets move to android side. But before moving ahead if you need you can download my API code.

No comments:
Post a Comment